Monday, April 17, 2017

Blog 13 scout

1. Provide the updated computer drawing for your individual RG setup.
(Upload soon)
2. Explain your setup.
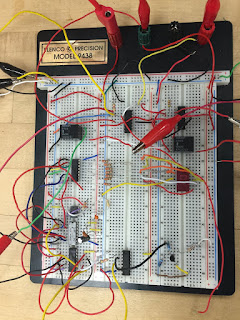
The transition of my circuit of the previous Rube goldberg circuit will lift a hoist off of a photo-sensor.  The photo-sensor is used as one of the two resistors in the non-inverting amplifier.  The voltages are close enough that once the photo sensor is given light that it then produces a high enough gain that it switched the relay.  The two outputs of the relay are connected to a diode, that is lit to show the relay hasn't switched yet. Once the relay is switched the rest of the circuit is activated. First the 7 segment display counter is activated and is counted from 1 to 9 and the motor will spin from 4 to 9.  There will be a 555 timer, 74192, xor gate, and 7447 decimal counter. The motor will spin lifting the gate which releases the ball.  As the ball falls, there a switch at the bottom which is activated when the ball hits it.  When that switch is tripped it will activate another motor dropping another ball which will hit a switch on mine and also hit another switch which activates the next circuit.
3. Provide photos of the circuit and setup.


4. Provide at least 2 new videos of your setup in action, one being a failed attempt.

(Videos will be uploaded later)

5. What failures did you have? How did you overcome them?
A failure that I had to overcome was trying to find the right resistors for the photocell when exposing it to light.  At first, we couldn't find a good enough cover for resistor, but then when adjusted the resistors it worked correctly.
6. Group task: Explain your group RG setup.
Austins circuit will trigger mine by blowing a paper off of my photocell, which causes my relay to switch.  At the end of mine a ball will fall down a ramp running into Mohamed's lamp cause it to turn on which activates his.
7. Group task: Video of a test run of your group RG.


Blog 13 Group 1

Blog 13
Explanation:
I (Austin) will begin the Rube Goldberg by turning on my power supply which will activate a motor at the top of a ramp which will pull a car with a piece of paper on top of it to cover up a photo resistor. Once this photo resistor is covered it will flip the relay powering the motor at the top of the ramp to the motor powering the lift. Once the lift begins to go up a cover uncovers another photo resistor which will flip a seperate relay to power the fan. The fan will blow a piece of paper off of Scout's photo resistor. This will switch a relay that will start an upward counting decimal counter. Once the decimal counter reaches number 4 using logic gates the first motor will run allowing a ball to fall down a mechanical contraption. Once the ball reaches the bottom of the contraption it will flip a switch. This will start another motor that will release a ball down a tube. This ball will hit another switch. This second switch will activate a lamp this lamp will activate a photocell for the following project.


Sunday, April 16, 2017

Blog 13 Austin

Blog 13

Computer Drawing:

Phase 1:


Phase 2:


Schematic:


Explanation:
One side of the first relay runs the motor atop phase 1 which powers the car to be pulled up the incline which eventually covers the photo resistor. This flips the relay to the other side which power the motor of phase 2. This causes the lift to go upward therefore, uncovering photo resistor 2 which then flips a sepperate relay to switch on powering the fan to blow a piece of paper uncovering Scout's photo resistor. Some issues I still have with my setup is that the time just barely reaches the 10 second minimum this is primarily due to when the left begins to lift up it uncovers the photo resistor beneath it so quickly that it almost instantaneously swithches the second relay. I want to make a more elaborate cover because if you look closely this was the failure in my second video. The fan starts running even before the lift begins to move because the second phtoto resistor was never covered properly. Although the above schematics look very similar it is important to note that the location of the photo resistors in relation to the op amp gives them the required functionality. The first one is used to increase the amplification when covered and the second one is used to increase the amplification when uncovered this is why they are in opposite possitions in relation to the op amp in the schematic.

Pictures:

Figure 1: shows incline of phase 1

Figure 2:Shows DC motot 1 at the top of phase 1

Figure 3: Shows phase 2

Figure 4: Shows phase 4 (the transition)

Figure 5: Circuit board

Videos:
Video 1: Sucessful Rube Goldberg

Video 2: Rube Goldberg failure

Failures:
The failure with the original circuit was primarily that I could not achieve pulling off the piece of paper with only 1 second of power so I eliminated the clock from my circuit and added in the additional relay, opamp and motor. Another issue I had was for some reason I still have not been able to understand is that on the day of the individual demos my motor on the top of phase 1 kept getting weaker after each use. I decreased the incline to provide more room for error and have since had no issues with it.


Monday, April 10, 2017

Blog 12: Scout

2. Explain your setup.
The transition of my circuit of the previous Rube goldberg circuit will lift a hoist off of a photo-sensor.  The photo-sensor is used as one of the two resistors in the non-inverting amplifier.  The voltages are close enough that once the photo sensor is given light that it then produces a high enough gain that it switched the relay.  The two outputs of the relay are connected to a diode, that is lit to show the relay hasn't switched yet. Once the relay is switched the rest of the circuit is activated. First the 7 segment display counter is activated and is counted from 1 to 9 and the motor will spin from 4 to 9.  There will be a 555 timer, 74192, xor gate, and 7447 decimal counter. The motor will spin the bridge moving the object down it the down a ramp to the next circuit.
3. Provide photos of the circuit and setup.


4. Provide at least 2 videos of your setup in action (parts or whole), at least one being a failed attempt.

5. What failures did you have? How did you overcome them?
1 big failure that I had which was hard to overcome was solving for the voltages to make the amplifier trip the relay.  I have many different voltages coming in so it was hard to make all of them work with each other the way I wanted them too.  Finally I solved for the right voltages and i was able to overcome that issue.

Sunday, April 9, 2017

Blog 12 Austin


Blog 12

Computer circuit schematic:


Explanation:
The circuit begins with the countdown on the seven segment display using the display, the clock, the driver and the decimal counter. This portion of the circuit is similar to the circuit we built in class on week 7 with some minor adjustments to make the clock count down instead of up. Then the outputs of the counter are also branched off to the series of or gates which give the output of 1 for every number beside zero. Then that output is put into a xor gate which has its output connected to an NPN transistor. This then allows a separate supply voltage current to flow through the transistor once a base voltage is supplied. This emitter current is used to power a small motor that only runs for 1 second while the clock is on zero but should theoretically be enough time to pull a cover off of the photo sensor. The photo sensor is used as R1 in the non-inverting op amp shown below and by using the photo resistor in this way when the photo resistor is covered the gain will be essentially 1 because the resistance of the covered resistance is about 30k ohms. Therefore, with R1 being about 4k when the photo resistor is uncovered it has a resistance of about 3k so by analyzing the equation provided below the gain should double when uncovered vs covered and it does. Then the output of the op amp is applied to a relay so that when the cover is removed the relay switches outputs and powers the larger motor to power the lift. This is where the circuit ends.

Photos:

Photo 1: Entire circuit minus the two motors.


Photo 2: Close up of relay, op amp and driver.


Photo 3: Close up of clock, decimal counter, and or gates.

Photo 4: Close up of Xor gate, transistor and display.


Videos:
Video 1: Shows how the clock counts down and is used to pull the paper away from the circuit.

Video 2: Shows the problem with the motor pushing the entire contraption away from itself.

Failures:
I have encountered many failures throughout the process with connection issues and also just simple design flaws. The two major failures that I am still in the process of overcoming is how to get the small motor to move the cover from the photo resistor and how to secure the motor and lift in place so that they don't push each other away. These mechanical failures are proving to be harder than anything I encountered while building the circuit. One failure I have overcome was with triggering the relay I was trying to use the photo resistor in a different way. I was trying to use it as a current divider of some sort and then I did a little reading into the op amp and realized that the op amp is just a configuration of a bunch of CMOS transistors and that no current actually flows through the input. This is when I got the idea to use it as R1 on the non inverting op amp and that worked much much better.